Tuesday, June 18, 2013

Tromba Marina


I had the good fortune to visit the Cité de la Musique in Paris quite recently and spent a criminally short period of time moving through its permanent collection of musical instruments in the Musée de la Musique.

A multilingual headphone and console setup allows you to dial into a multitude of recordings of the actual instruments on display as well as sync up with several interesting short video documentaries covering subjects ranging from the history of the contemporary orchestra, lutherie and brass instruments through to indigenous tribal music performances and the more modern Avant-garde incorporating all manner of electronic and computer-based music synthesis.

The collection includes many ornate early keyboard instruments,
 including this rather ingenious 'portable' harpsichord.
Amongst the variety of stringed instruments  once holding pride of place in the orchestra are various Viola da Gamba, this strange monstrosity (below, left) and the even stranger and very scary sounding Octobass (below, right)
At nearly 3 and a half meters in height it requires a certain degree of elevation for the player and further assistance from a series of levers and pedals to fret the instrument. Typically a second player is responsible for bowing.

Speaking of awkward stretches there was also a 'gymnasium for the hands' designed to stretch, strengthen and otherwise contort the hands of the most accomplished piano soloists as well, I assume, a horde of wannabees?
Further treats lay in the modern electronic music section of the collection which included a Theremin and Ondes Martenot.
Ondes keyboard (left) and Palme diffuseur or speaker (right) with sympathetic strings. Edgard Varèse's Ionisation gongs can be seen in the background.

Still very much recognizable as musical instruments, Ondiolines, early Moog synthesizers and EMS VC3 synthesizers eventually give way to the hardware of the consoles of Musique concrète and the synthesizers of music academia.


Pierre Henry console (left) and Gmebaphone (right)

In spite of all of the above and  a rather fascinating 'World Music' exhibition, the true highlight for me was the discovery of the Tromba Marina.


The Marine Trumpet (also known as the Nun's Trumpet - women were not allowed to play actual trumpets in the church in Germany in the 1600's) is essentially a bowed monochord. It is fretted by lightly touching the nodal points on the string to excite its natural harmonics. A specially constructed bridge that is allowed to move and vibrate freely against the instrument's soundboard produces a buzzing sound with each bow movement making a sound not dissimilar to a trumpet.


The instrument eventually fell out of favor in the 1800's. Small numbers still exist due to revivalists and enthusiasts and - thanks to the Musée de la Musique. And no, no Dulcitones in sight.


Monday, May 13, 2013

The Knock

Another Cheap Seats performance is available to view. this time for the song "The Knock"


The performance of "A Man to Avoid" is available here
For other Cheap Seats performances go here

Thursday, March 21, 2013

A Man to Avoid

A Man to Avoid

This here dress,
I want you to put it on.

This here Foley,
I want you to make the sound

Of desire
and disgust

This is a man to avoid.
You fall in late,
you fall out with him.

This is a man to avoid.
He'll pour his name into your veins
and shame you in a crowd.


This is a man to avoid.
You fall in late,
you fall out with him.

This is a man to avoid.

Desire, disgust

Tuesday, March 12, 2013

Cheap Seats

"A Man to Avoid"
Ramon Galvan, Nick Da Silva

New Cheap Seats portrait: Ramon Galvan, A Man To Avoid. Performed and shot in Cape Town


Thanks to Dirk Hugo and Gareth "Danger" Jones for camera, audio recording mastering and film edit and inviting us to take part in this ongoing project.

For other Cheap Seats performances go here

EDIT:

A little bit of publicity and background from Rollingstone SA website here

Several years ago an avant-garde rock band named Blackmilk was making a name for itself on the circuit in Cape Town – there was a period where the weird and interesting was appealing in that city; outfits like Benguela and sound artist James Webb were finding regular gigs at otherwise "commercial" nightspots... and drawing fair audiences.
Blackmilk frontman Ramon Galvan took some time off in the mid 2000s it is said, and all but disappeared from the playing schedule. OFF THE RECORD was made aware this week by producer and debatist DjF Head, however, that the singer/guitarist has in fact continued to work, producing at least one full album (that we know of) entitled Outer Tumbolia(2009).
In the video below, Galvan and long-time The Galvan Trio collaborator Nick da Silva execute the track "A Man to Avoid" live in a room at their home in Cape Town. As the aforementioned DjF Head put it: "one of the most underacknowledged talents in the land. Hopefully this footage goes some way towards rectifying that."

Sunday, March 3, 2013

Restore VI

I had not intended to do a further post on this, as I think the previous five posts summed up the past two years of toil quite well. Then it dawned on us that a small video demonstrating that the dulcitone not only looked good now but sounded pretty good too wouldn't be such a bad idea.


The last few percent of improvements were some of the toughest to achieve with meticulous note taking about what element or component was hindering performance. Multiple sweeps of each key was required and along the way certain concessions and resignations were required when margins of improvement were, for now, outside of our grasp.

So, there are still some forks who's tuning had drifted somewhat and some keys and hammers are a little "lazy" in returning to their default positions which can create the odd dead spot when playing. I would imagine some bespoke overhaul of some hammers or the sourcing of similar hammers from a grand piano supply might be an option in the future, but for now she has taken place of pride in the domicile-cum-studio and has already started contributing to some new recordings. So watch this space!

Also a final word of gratitude to Americo, my father for his tireless assistance, ingenuity  and camaraderie during this project.

EDIT: Parts 1,2,3,4 and 5 of this story

Sunday, February 17, 2013

Restore V

The dulcitone was taking shape and the first time fitting the legs was encouraging, but also a little worrying.


The real problem sat between the two newly assembled legs and is covered in fur, is very curious and prone to bouts of extreme hyper-activity. That and the fact that the dulcitone's new home would be on a very springy wooden floor lead us to want to slightly over-compensate on the rather top heavy instrument's stability.

We made a decision to steer away from the classic original design and introduced a cross bar that could be easily removed to get a bit more rigidity when standing upright.


The design decision was rather fortuitous as the refashioned damper pedal ended up being attached to this cross bar. This, in my opinion, was a vast improvement on the original design both from an aesthetic and practical standpoint.


As is evident from some of the preceding photographs, the exterior has a polished shine to it, so although this is described far better elsewhere on the web, I will briefly describe the French polish process.

This involves first very carefully and smoothly sanding all of the instrument's wooden surfaces, followed by the application of literally hundreds of layers of alcohol dissolved shellac in order to produce a mirror like, "tiger's eye effect" sheen out of the wood.

We opted for an orange/brown shellac mostly due to availability, although would perhaps have preferred a darker hue.

Not all shellac is created equal. Some has a higher wax content which means you need to add less olive oil for lubrication when applying to the wood. The wax buildup rises to the surface of the wood and can be cleaned of with some alcohol charged gauze.


A 2oz solution of shellac was mixed and applied with a cotton pad which housed a gauze core. First planar motions followed by more random figure of eights and circular motions are used to apply micron thin layers of shellac to the wood surface. The odd few drops of olive oil can be used for lubrication every now and then, if needed.

Optionally, tiny amounts of FFF-grade pumice powder can be used to work into the wood pores for a really smooth finish. The pumice behaves both as a filler and as a slight abrasive to encourage wood and shellac particles into small pores in the wood surface.

We struggled to purchase pumice powder in small enough quantities (50kg!!) so we opted to work a pumice stone with a file in order to get powder. Whether this was fine enough or whether it is really worth going the pumice route (for this type of project) is questionable. Our experience, using the materials we had at our disposal, was somewhat mixed.

After 40 or so sessions of shellac application, with each session adding multiple layers, you start to see a finish that is both pleasing to eye and fingertip. Final polishing is preceded by fine sanding with 1200 grade sandpaper in order to smooth out any irregularities.

All of the above steps need to take place in a dust free environment with lots of good light so as to prevent and identify blemishes and uneven application as soon as possible.

The final polishing is done with a 1oz solution so just add the same amount of alcohol into the bottle of solution you have. A few applications should be sufficient to finish of the job.


You should just be able to make out the leather belt we added to the base to secure the folded legs during transportation.

EDIT: Parts 1,2,3,4 and 6 of this story

Sunday, February 10, 2013

Restore IV

The body of the dulcitone was in pretty poor condition, but pretty much intact. A rather nasty hairline crack was remedied by sinking very long thin dowels down the one side to reinforce the frame. All parts that could be removed (such as the lid) were separated from the rest of the body and completely sanded down with cracks and gouges filled and corner chips refashioned with small shards of wood. The body itself was sanded down to remove the years of caked on dust, random swipes of enamel paint, and corroded varnish.


Several runs of aerosol insect killer and turpentine were aimed at all suspicious woodworm holes.

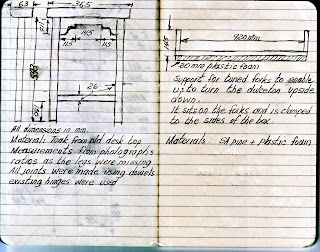
The legs needed to be rebuilt, along with the brackets that attached them with a hinge to the base of the instrument.


Online photos of intact models were used to calculate the approximate dimensions.


The original legs were fastened to the dulcitone base with some rather nifty thumbscrews which also enabled relatively easy release to fold them under the base, allowing for storage or transportation. The small remaining fragment of thumbscrew gave enough away to convince us that screws and threads like this simply did not exist anymore and it would be better to replace them with something brand new that at least functioned in the spirit as the  original.


This took a couple of attempts to get right. Included below are both the first attempts and the final mechanism.

First prototype using wing-nuts


Final version with silver soldered nuts and bolts

Sadly the wing-nut version could not be used as there was not enough clearance for the heads. Oblong threaded washers were sunk into the dulcitone base to complete the mechanism.


Thumbscrews installed

In jobs like these, the jigs you use are often just as important as the finished product. The more time spent making the correct bracket to hold something in place, the more likely you are going to be successful in your endeavors.  We built a number of jigs and purpose made tools to make our lives easier. These included: 
  • a little mounting bracket to place the snapped off tuning forks in order to test the spring steel fork holders we were making, 
  • a little felt tipped hammer to strike the forks to test them when the keyboard was removed, 

  • drill guides in order to sink very long dowels into the dulcitone body for reinforcement 
  • and this simple but effective foam lined bracket that allowed us to turn the whole instrument upside down so as to work on it with out disturbing or otherwise straining any of the delicates.


If this all sounds very time consuming, then consider that we had not even started the french polishing!

EDIT: Parts 1,2,3,5 and 6 of this story

Sunday, February 3, 2013

Restore III

So where to begin? What needed fixing? How did we fix it?

Any replacement parts required were unlikely to be found in some spare parts store, so we either had to find the closest possible alternative or manufacture new parts from scratch. Even something as simple as replacement springs required months of following up leads and multiple candidate spring purchases (small runs of designer springs are too financially prohibitive)  and testing with samples so as not to introduce a more inferior, or too strong spring into the equation. Here is a brief summary of some of the things we worked on to improve or fix the overall mechanism:


a.) 
As one of the white keys had missing ivory on top a suitable replacement in the form of 1 millimetre acrylonitrile butadiene styrene (ABS) plastic was sourced. This was about the same thickness as the ivory and had been recommended by a piano restorer that I had made a few inquiries with. Since the use of ivory for piano keys is basically illegal plastic was the only viable alternative. It could be scored to the dimensions required and then snapped at exactly these cuts to make a very accurate replacement. (although a little whiter than the yellowed original)

(It's the A#)

In addition to this, other, loose ivory was re-glued and the keyboard was cleaned removing years of caked on dust and vermin excrement. A combination of rubbing alcohol swabs and slowly applied amounts of toothpaste appeared to provide the best results. An earlier attempt with nail polish remover proved too corrosive to the shiny finish of the ivory.

b.) 
Finding suitable springs for the back of the keys proved most problematic. This was largely a trial and error process. Given that the keying mechanism does not need to be as sensitive as a piano's, since a player is not really capable of pianissimo type dynamics on the dulcitone, we felt it acceptable to err slightly with springs that were probably stronger than the originals when they were new. This was guesswork as we had no idea what the action of a brand new dulcitone felt like.


c.) 
While a lot of the hammers had felt that certainly showed signs of being snacked upon, they were still in reasonable condition. There was, however, one that had broken right off.


Interpolating the dimensions of the missing hammer by looking at the hammers on either side,


a new core was carved out of teak.

(Notice the slightly elongated base to cater for part of the hammer dowel that was snapped off.)


Felting of piano type hammers involves the use of hydraulic presses capable of exerting 35 tons of pressure in order to pre-shape and glue the felt in low temperature controlled environments. In the absence of this, we sourced 1cm thick dense white felt, cut this to shape and glued it around the teak core with many mini-vices to keep the felt from buckling. A little bit of steam was applied to the felt before hand to make it slightly more pliable.

After assembly, the attack onto the forks was deemed a little 'soft' compared to the other hammers, so a light application of diluted wood glue was applied to the surface which restored some of the 'bite' to the hammer's attack. Job done!


d.) 
When the hammers return to rest after being pressed their dowels are pressed against felt of approximately 4mm thick. Much of this felt had been eaten away by vermin. Replacement felt was relatively easy to source and apply. The only interesting anecdote worth recalling is that to retract all 61 hammers simultaneously away from their resting point in order to glue down the felt strip required a 1cm diameter steel rod. A wooded dowel almost snapped under the combined strength of all the hammer and key springs.   
Another view of the new hammer and the re-felted surface against the dowels

e.)
This area contains an essential part of the keying and hammering mechanism as the hammers trajectory downwards onto the forks is guided by an ingenious combination of springs, felted pads coated with fabric and a simple cam that governs the exact depth of the hammer strike and controls the retraction of the hammer upon striking the forks so at not to strangle the tone. Some of these were in dubious condition and a number of new fabric coated felts were introduced. Each cam surface was given a coating of graphite powder for lubrication. This stage was particularly time consuming, hell on the back and constantly felt like being both on the performing, and receiving end of a root canal!

f.)
Replacement of all felting cushioning the actual keys as they come into contact with the dulcitone body so as to minimize any unwanted percussive noise. This included the manufacturing of circular pieces of felt needing to be placed around the metal rods which govern the key trajectory. 61 times. Each metal rod, sanded of oxidation and grit to ensure smooth key action. 61 times. Yeah.


g.)
Each damper felt was replaced with 5mm felt. A lot if this fine work (not only to remove the felt but also glue) was performed with a high speed Dremel tool using a variety of heads. Its doubtful such non-invasive precision could have been performed with anything else.

The damper mechanism itself is initiated upon release of the keys, when two tiny springs bring the damper gracefully down onto the just-stuck, vibrating forks to deaden all tone. Due to years of over-stretching, these tiny springs, I suspect, had become weakened to the point that not all of them came down with sufficient force to mute the vibrating forks. Sourcing springs tiny enough seemed fruitless. Even if we did find some the mechanism would have been rather difficult to get at to do any micro surgery on.

Instead, we opted to place and glue tiny lead fishing weights just above the felt on each of the problematic dampers. In most cases this provided sufficient moment to successfully choke all vibrating forks.

Two different types of weights depending on the severity of the damper spring so as to not unnecessarily overweight the mechanism.

This fix brought about an additional improvement. With all tuning forks properly dampened in their default or rest position, there were less vibrational noises when playing the instrument which would normally be caused by sympathetic vibration. 

h.)
While all the tuning forks were still present, some were rather badly oxidized  which affected tone, timbre and tuning. Not being able to do too much about tuning, we opted to very, very carefully clean and polish some of the bad ones which considerably improved the tone and sustain when struck.

Tuning bracelets (added for fine tuning adjustment upon installation) had come loose from the forks and were contributing to sundry rattling. these were firmly reattached with blobs of glue.


Photo depicting rusty tuning fork with loose tuning bracelets, missing springs, eaten hammer felt, not retracting hammers and damper felt about to fall off. The wooden piece with the nails in folds over the forks with the nails keeping the forks apart so they don't bash against each other when being transported. 

i.)
A number of the leather fork holders needed to be replaced as the leather itself had hardened or perished to the point where they were providing little support and tension for the forks. This was again a rather laborious process and made harder by the presence of the aforementioned fork tuning bracelets. Suitable screws and paper washers (made from gasket paper material) needed to be sourced and manufactured as there was significant rust and wear to those components.

j.)
The 7 smallest tuning forks had completely snapped off their sheet metal fork lift springs. This was not a trivial salvage job as they were initially riveted onto the forks. Their job was to provide support but also be sufficiently  springy to allow the forks to vibrate freely.

First the old rivets were drilled out, then a machining tap was used to cut an internal thread in the hole of the tuning fork. This would allow a new spring support to be screwed in. This was not easy at all!

Finally, a suitable sheet metal fork lift replacement needed to be sought. Our first thoughts were to use sections from the spiral of a clock spring. This unfortunately did not provide the elasticity to allow the smaller forks to vibrate when stuck. In the end trimmed and shaped sections of sardine can lids provided the solution.

Fresh leather holders as discussed in (i) and forks 1 through 7, from right to left all with their new sardine can fork lift springs.

k.)
All the felt directly below the forks was replaced. This reduced rattling and buzzing significantly.

l.)
The sustain pedal and body of the dulcitone will be discussed in subsequent posts.

EDIT: Parts 1,2,4,5 and 6 of this story

Sunday, January 27, 2013

Restore II

For the uninitiated or the lazy the dulcitone was designed and manufactured in Scotland in the late 19th and early 20th century. By about 1915, production was halted as either popularity waned or impracticality of mass production and portability had the final word. Not being the loudest of acoustic instruments, its characteristic timbre was ultimately better sought by composers and ensemble arrangers in the louder vibraphone or celesta.
Photo: Andreas E Beurmann

What does the instrument sound like? To my ears, a lot like an acoustic version of a Fender Rhodes electric piano with a special warmth in tone somewhat lacking in say, the celesta. Of the 2000 odd manufactured, very few are in existence today and even less in passable working order. I suspect that this something to do with the rather bold claim that they were "portable", with fold-able legs allowing for transportation but rather delicate innards to be entirely suited to the rigors of the missionary's ox wagon.

Those delicate innards are best described with the aid of the following diagram courtesy of Sue Mo from her informative website.


In short, a hammering system, not unlike that of a grand piano, was employed to disengage a damper and strike a steel u-shaped tuning fork (which was responsible for the beautiful bell-like tone) which was held in place by oblong leather pieces. These maintained sufficient tension on the forks which rest on u-shaped sheet metal springs.I have made one minor alteration to Sue's diagram above in blue. There is additional felt that may or may not come into contact with some of the tuning forks (certainly some of the larger heavier ones) and this seems to ensure that there is minimal rattle when they are struck by the hammers. As can be seen from the diagram above, a rather intricate series of felted surfaces, springs and even a simple cam work in concert to enable the whole mechanism to work perfectly and noiselessly.

A foot operated pedal can be used to disengage damping entirely allow for more sustain when playing.

EDIT: Parts 1,3,4,5 and 6 of this story

Monday, January 21, 2013

Restore

I am looking through an old EXCEL spreadsheet I found on my laptop from when we first opened this thing up after I got it back from the junk shop that masqueraded as an antique shop. I had decided to make some notes about what was broken and what needed fixing.

On a musical instrument with 61 piano-style keys, a lot can not work. A total of 18 keys made no sound at all. That's a success rate of about 70%. Does that sound like a passing mark? The average chord and melody when playing a keyboard requires about 4 keys to work concurrently, so the chances are, that you would play a harmonically weakened chord or strike a horrible empty phantom note in your melody.

I'll admit that when I describe it like that it almost sounds intriguing, but playing a keyboard note in vain has to rank as one of the most soul sapping sensations imaginable. Of those 40 odd keys that produced a chime, very few produced a pleasant consistent, repeatable tone and few had a damping mechanism that worked at all. Looking at the filthy baby coffin sized box, it all seemed like a bit of a lost cause - a lost cause that I was sure I had been over charged for.

It's not like I could shop around for a better deal. At about one hundred years old, and relegated from all but the most niche musical ensembles, if you find an old dulcitone, you buy it.
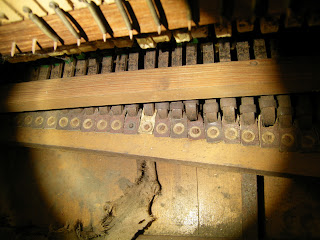
If these probing torch lit photographs resemble some recently uncovered sunken treasure then you are not far off. There was a sense of a long undisturbed and very brittle find about the whole affair and early forays and views of the structure were beset with some trepidation of making a rather sorry situation a lot worse.

There was a lot of oxidation, desiccated leather, felt consumed by vermin, overstretched springs, missing or broken key components, evidence of wood worm infestation and about a century of caked on dust and cockroach poop. 

This was going to be a real task.

EDIT: Parts 2,3,4,5 and 6 of this story

Sunday, January 13, 2013

Nostalghia

Been looking for a clearer, cleaner version of this for years.

and some information to boot

Thank you internet!

Lifted directly from description body of second video)


Oh,kumushki*, be friends with each other 
Be friends with each other and love each other
And love me too
Go to green garden
And take me with you 
You'll gather flowers
Gather some for me too
You'll wreathe chaplets
Oh,wreathe one for me too

Go to the Danube river
And take me with you 
You'll sail your chaplets by water
And sail mine too
Your chaplets were sailing adrift
But mine has sunk...swam like a stone..swam like a stone
Your sweethearts have returned from war
But mine hasn't 
He doesn't come back, he doesn't write any letters
He's forgot about me...about me... 

* 'Kumushki' means lady friends, particularly those, who have exchanged their baptismal crosses for a week, in accordance with the old Russian custom,done soon after Easter Sunday